Tuesday, March 30, 2010

"original" color


LOTS of sanding

Alright. Enough of the West Texas camo paint scheme. I was really thinking of the marine blue because thats a really cool color. But the interior paint, for the most part, was pretty good shape. So the hunt for a limestone color was on.


Self etching primer..M.O.D.ish

Soooo....brush paint job like a lot of people do, roll on, spray, or rattle can spray? I'm going to clean up a fender, prime it with self etching primer and try to rattle can it. Then wet sand it and see if it comes out without spray lines.
If not, I'll clean it down and actually spray it.

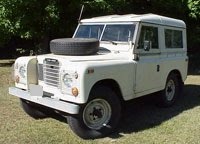
Paint findings: Don't even look at valspar. Weak and runny and too light colored. Krylon was close and had good coverage, dupli-cote is really good but they didn't have anything in stock close to almond. Tractor Supplys I.H. off white is close but more putty colored. I chose rust-oleum almond. Its a little lighter(brighter?) but the same base color. With a little sun aging and some dirt it should age to the inside color. I have new interior door panels so they aren't a worry.
It might just work.

Trying to un-ding birmabright is a gentle process compared to regular metal. I tried tapping with a hammer to a flat piece of metal.. If you hit too hard, there will be a round "hicky" where the metal compresses. The best thing I used was a nylon hammer with my hand as a backer.

Looking better.

For the footwells I'm planning to put on herculiner on the floorboards, under the seatbox, door innards, and inside the top. This should kill some of the gear whine. I used 1 1/4 gallons of herculiner on the inside of my old bronco and the stuff was pretty amazing. Except for loading a full size truck axle in the back and scratching a hole in it, it held up to everything.
Monday, March 22, 2010

feeling fuelish

After the fuel line incident, I pulled the pickup tube and headed for oreillys. The parts guy finally figured out what was needed and produced this:

The hole for the filter is .03 microns smaller than the tube, so out came the needlenose pliers and it got adjusted to size. When doing this be sure that you don't make the hole too big that it doesn't have friction on the tube, otherwise it falls into the tank and you have to fish it out. Don't ask how I know this.

The filter has a "nipple" on the inside bottom to keep the tube from hitting bottom, I grooved out a couple small sections so it couldn't suck the filter up and shut off the fuel supply.

Sunday, March 21, 2010

Kawasakis rule.

With most of the problems buttoned up, I took the rover for a 'speed test'.
BTW
These things can't speed, so don't worry about calling the sherrifs office.
I got the carb adjusted again, warmed the engine some and took off.
Accelerated good, shifted good, but after the first stop sign she got up to '40 ish'
and started sputtering. Hmmph. Turned her around and limped home with the engine barely sputtering at idle.

OK, Drained the last gallon of gas and lo and behold... crap from the tank came out. Its got to be varnish from the top corner of the tank that was missed. I strained the fuel, and poured it back thru through to wash out the rest of the crap in the bottom. It came out clean. Yay.
Put another gallon of fresh gas in and took off again. And it did the same thing. Except this time on the turn around the engine completely died. Dead. Nada.
I could spray carb cleaner into the carb and get it to fire for a couple of seconds, but it wouldn't run.

While pushing it downhill a guy on a Kawasaki four wheeler pulls up with a rope and asks "need a tow?". Not being the humble type I accepted. (Thanks to Brian)
The rover was pulled back the 1/2 mile to the driveway at a leisurely 7mph according to the speedo.
At home, the fuel line to the carb came off and the engine was cranked. A smidge of fuel came out only. Pulled and cleaned the rochester which had a little crud in it, cleaned the fuel pump bowl which had a little sediment in it, and fuel still wouldn't pump. Finally blew compressed air into the gas line and a bunch of crap came pouring out followed by clear gas. All is well, need to find a sock for the fuel pickup tube.

Wednesday, March 17, 2010

The REAL test drive

Today:
-found the m.i.a. bag of bolts so the floorboards got screwed in along with transmission tunnel
-repositioned the new speedo cable so the exhaust isn't melting it and so it connects to the speedo without popping off
-shocks are on! Grand Wagoneer fronts and dodge 3/4 ton rears, all monroe sensa tracs. (pictures to come) I had to remove all the shocks stock bushings except the rear lowers. They were designed for a 1/2" mounting stud, not 3/4". I ground down the stock shock bushings to fit the shock eyes. Thats 12 bushings btw.
- the "defroster" vent control panel got put on and works. yay.
-screws into the dash

With the carb retuned I took off down the street... again.
Shifting was exceptionally good today, the engine didn't bog, it drove straight, and with shocks it didn't bounce all over the place. The shocks weren't so stiff that it was a bone-jarring either, actually pretty smooth on the smooth stuff.

The speedo cable popped off the first time out, but a little repositioning and it started reading. It got up to "55" and sounded like a bomb ready to go off. But i had a big smile on my face listening to it.

After 5 miles of driving the engine started losing power intermitantly, so i hauled butt home at 10 mph. in the driveway the engine smoothed out and died. Gotta get the fuel guage fixed and put in more than 2 gallons at a time.

Experimented with spray paints today- the colors came down to a krylon almond or rust oleum hard hat almond. both were pretty close to original color.

Friday, March 12, 2010

Seat belts and vents and shocks- oh my!


Well, I managed to get my right angle grinder (probably the best tool in the shop) back and began the journey of putting in seat belts. I cut the original Jeep mounts down, and welded extra strengtheners to the mounting plate. Here is the result:


I saw another set like this on the web and it had protective cover plate, so using my mad skills the belts got a -sturdy- cage around them out of galvanized sheet. they will bolt to the wall between the mounting plate.

From the passenger side, the plate will mount immediately above the wheel well. I still need a guide for the belt to run through to keep it from rubbing on the trim.

While waiting for the paint to dry, the vents got hooked up. note: the little screw on arms go up to the hinge. When you put them on upside down it doesn't close.

Notice anything different? Probably not. I ejected a bunch of junk from the back to make some work room. The dash is mostly completed, seat belts in but not mounted, rear passenger seat in, spare tire on hood now.

And my shocks came in. They are a set for a Grand Wagoneer for the front and a Dodge 2500 for the rear. $36 for 4 shocks. Thats almost stealing. The eyes may have to be modified to fit the bolts, but these have, from what I've seen, about 2 -3x the travel available of a stock shock.

Tuesday, March 9, 2010

The dash and belts.

The wiring was assembled after a month hiatus, having to re-learn the wiring and where it goes, the power was re-routed to give the lights and accessory lighting full time power.
Accesory lighting used to be dash lights switch, but is for the dome light now. I may add floorboard lights just for kicks for those topless nights.
The wiper and fan are key-on power only as are the passing beams (like it needs those)
With the dash on I tried to take her around the block, and the speedo isn't registering. Dang. Hopefully the cable just pulled out when I finagled it in there.
At least the lights work.
I think that I said the front seatbelts came from a 2002 jeep tj. They're just the right length and the buckle side fits between the front seats perfectly.
The upside is that I found the long missing lower front seatbelt anchors in a pile of spare parts.
I'll make the mounting plate for the reel behind the seats and have real seatbelts!

The rover shifted pretty good going down the road, I dropped in a ditch, popped it in 4hi and its kinda anemic. Although 4 lo crawled up and over the edge of the driveway without problems, except for slamming the rear leafspring on the concrete coming back into the ditch, it seemed happy.

I'm hoping to have it ready for SCARR in Marble Falls, TX next month. This is hosted by Texas Rovers and has been around for a couple years.